How to Set Up iOS Push Notifications
Valid for versions 88 through the latest version
Version:
82
88
Overview
This tutorial explains how to configure your WHM account so that users can receive push notifications for iOS® mail. We introduced this feature in cPanel & WHM version 64. When users enable push notifications, they receive notifications when new messages arrive.
You must export the Apple® Push Notification service (APNs) key, and then install the key on your WHM server to enable push notifications.
-
You cannot create APNs certificates in macOS Server® version 5.7.1 and later. The macOS® Mojave 10.14 operating system requires version 5.7.1 or later. For more information, read Apple’s macOS Server 5.7.1 upgrade documentation. You can request that Apple includes this feature in macOS Server 5.7.1 on Apple’s feedback forum.
-
You must open TCP outbound traffic for port 2195 if your firewall restricts this port. For more information, read our How to Configure Your Firewall for cPanel & WHM Services documentation.
Create, export, and install APNs keys on your macOS device.
Receive push notifications for iOS mail
Create an APNs key.
To create the APNs key, perform the following steps:
-
Open the Apple App Store application (app) via Finder (Applications >> App Store). Sign in when the system prompts you.
-
Search for macOS Server.
-
Click the macOS Server icon.

-
Click $19.99, then click Buy App.
-
Click Open.
-
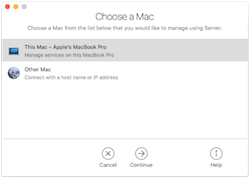
Select This Mac from the Choose A Mac menu and click Continue.

-
Select the Apple Push Notifications (APN) checkbox from the Settings menu.
-
Enter your credentials.
Export APNs key information.
To export the APNs key, perform the following steps:
-
Open the Keychain Access app via Finder (Applications >> Utilities >> Keychain Access).
-
Select System from the Keychains menu and then select Keys from the Category menu.
-
Press the control key and left-click (or right-click) the
com.apple.servermgrd.apns.mailkey (
) or certificate bundle (

).
-
Select Export “com.apple.servermgrd.apns.mail”…
-
Click Save to save the APNs key to your desired location.
-
You may need to enter your user credentials.
-
We strongly recommend that you password protect this file because it contains sensitive information.
-
Install the APNs key.
To install the APNs key on WHM, perform the following steps:
-
Navigate to WHM’s Manage Service SSL Certificates interface (WHM >> Home >> Service Configuration >> Manage Service SSL Certificates).
-
Select the iOS Mail Push Notifications tab.
-
Click Upload PKCS #12 archive.
-
Select the APNs key file.
-
If the Calendars and Contacts feature is installed on the server, select iOS Push for CalDAV to use the certificate for calendars and contacts or iOS Push for Mail to use the certificates for mail.
-
Click Install.
Configure the device.
To configure your device to receive push notifications, perform the following steps:
- Tap the Settings icon on your iOS device.
- Tap Passwords & Accounts.
- Tap Fetch New Data.
- If the Push toggle is currently set to Off, tap it to set it to On.
- Set your Email, Calendar, and Contact accounts to Push and Fetch as desired.
- After you finish setting up Push notifications, tap Accounts and then tap the Home button to close the interface.
To ensure that the device can receive push notifications, you must restart the Mail app. To do this, perform the following steps:
- Open the Mail app on your iOS device.
- Double-tap the Home button to display a gallery of applications.
- Swipe up to close the Mail app. For more information about how to close an app, read Apple’s® Force an app to close documentation.
- Re-open the Mail app.
- Swipe down to perform a manual fetch.
-
If the above steps do not successfully initiate push notifications, you may need to restart your device.
-
To enable push notifications for the default email account, you must enter the username
@the server hostname on the client device, not@the account’s domain name.-
For example, enter
[email protected], not[email protected]. -
For more information, read our Email Accounts documentation.
-
Lock screen notifications.
You can enable your device to display notifications from select persons on a locked screen. To do this, perform the following steps:
-
Open the Mail app.
-
Tap Mailboxes
 in the top left corner.
 -
Tap the information
 symbol from the VIP menu.
 -
Tap Add VIP…
-
Select the contacts from whom you wish to receive notifications on a locked screen to the VIP list.
Version
Specific attributes of this tutorial may vary with future Apple product versions. We used the following versions to capture this document’s screenshots:
-
OS X El Captain — 10.11.6
-
iOS — 10.2.1
-
App Store — 2.1
-
Server — 5.2
-
Keychain Access — 9.0
